Behold, I’ve finished building a combination lock for my garage door. I’ve told a few of my friends about it and I get the “you know you can buy those, right?” responses. But no, you can’t. This is a single button code lock for a garage door. I got the idea from Alan Parekh’s project (called Button Code) and decided to build by own based around an ATtiny13 microcontroller. Join me after the break for all the details and remember, if you’re lazy you can always buy a kit that will do this from Alan.
Alan’s interface method is what I was so interested in. Take a look at his video for the explanation. I would need a button and an LED for the interface but I’m doing things just a little bit differently than he did.
The Concept
I wanted to use an ATtiny13 microcontroller because I had ordered a half dozen a few years ago and still had most of them sitting around. This meant I would need to fit the code into less than 1024 bytes of programming space. I downloaded Alan’s code thinking it might be in C but it turned out to be BASIC so I decided to write my own from the ground up. I did start with my favorite Danni Debounce code (written by Peter Dannegger) to handle the button presses and coded a prototype using an ATmega168. Here’s how it works:
- The uC waits for a button press, then flashes the LED to let you know it’s ready for the first number
- You press the doorbell multiple times until the first number has been reached, then wait for the next LED flash… repeat
- Once all the digits are entered the uC checks for the proper code and opens the door (or flashes if you didn’t get it right)
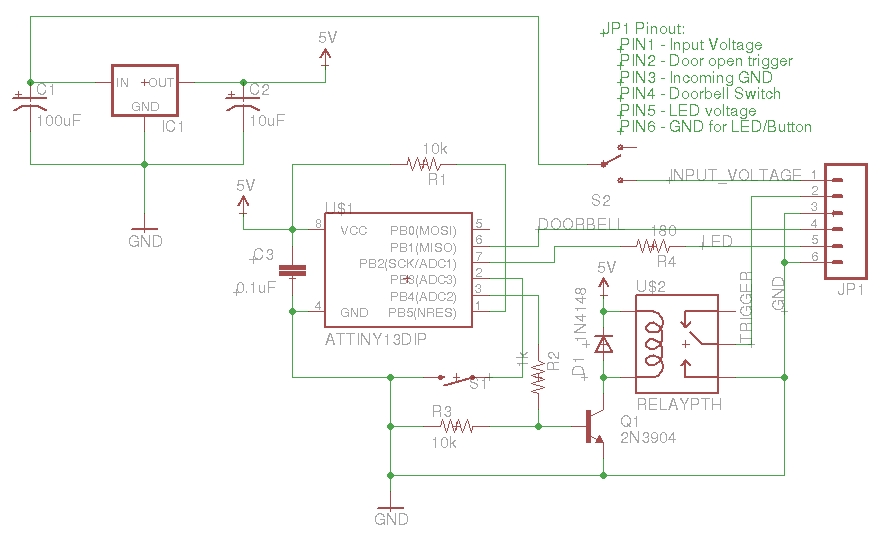
- The code can be changed by pressing a button on the circuit board (button will flash continuously). The new code is then entered the same way as above, stored in EEPROM, and read back to you in a series of blinks.
The Build
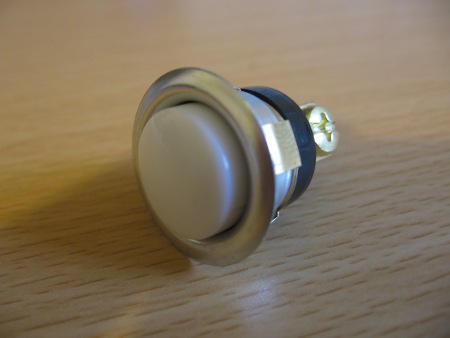
I started with a doorbell I picked up from the Home Depot. It’s lighted so I knew there must be room for some kind of bulb inside.
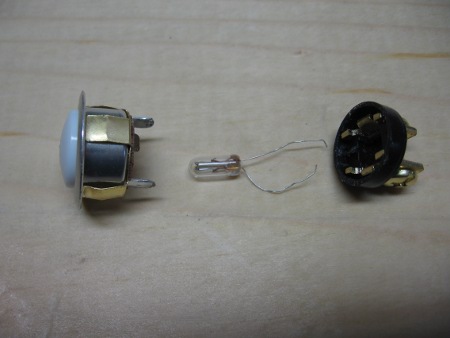
The bulb is incandescent and leeches off of the 16V transformer that doorbells use. I disassembled the unit and removed the bulb. It’s a bit smaller than an LED but I wagered I’d be able to make things work.
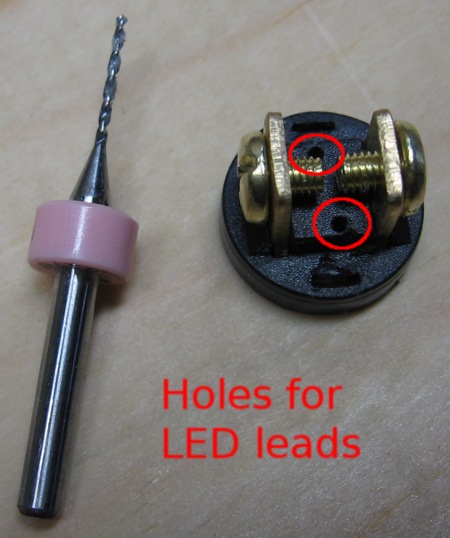
I used a PCB drill bit in my Dremel drill press to add holes for the LED leads.
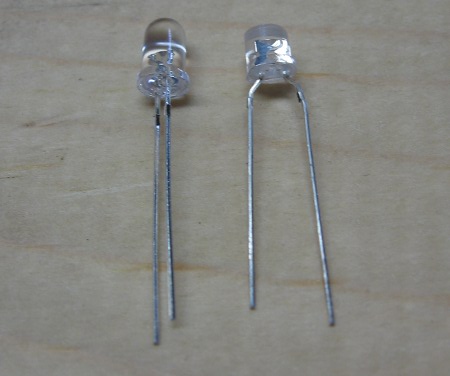
After a bit of trial and error I discovered that the LED body was just a bit too big. You can see that the LED on the right has had the dome cut off. This reduced the brightness of the crystal clear body but sometimes sacrifices have to be made.
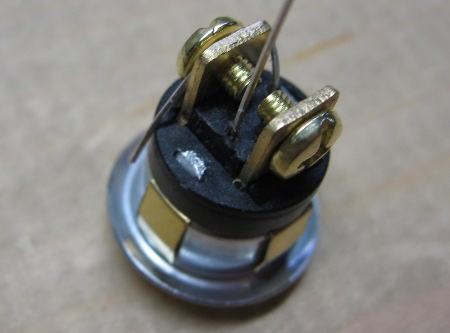
Here’s the reassembled doorbell. I’ve attached the negative lead to what will be the negative terminal of the button. After clipping off the excess, this doorbell will nest itself in a 5/8″ hole quite nicely.

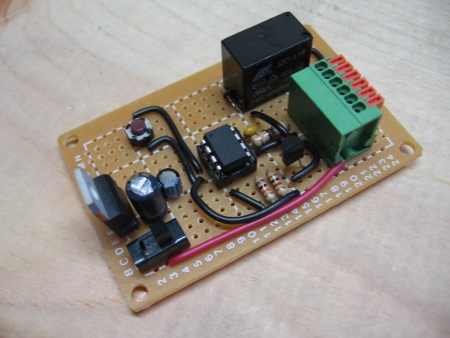
Here’s the assembled board. I used spring terminals for the connections. I’m planning on using single conductor wire for the button and opener connections so these will do.

Here’s a view of the soldered traces. This project was right on the cusp of being too simple to design and etch a board, and too complex to take the time to build with protoboard. Soldering probably came in between 1.5 and 2.5 hours.
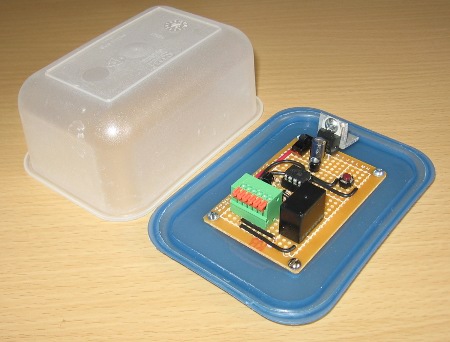
Ikea helped me out with an enclosure. This came with a set of storage containers and has already been heavily used for food. Now it’s got a new life. I don’t think I need a heat sink for the voltage regulator but I came across a small piece of threaded aluminum angle bracket from an old project so I threw it in.
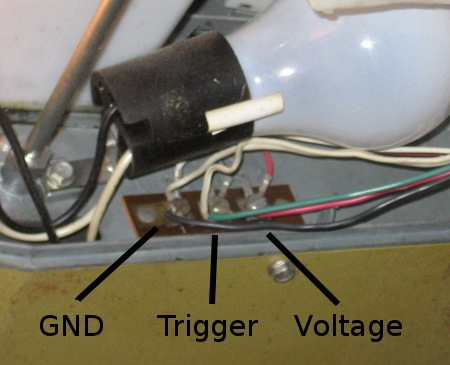
My garage door opener is quite old, but it has the connections I need. I measured 34V which is right at the top of my acceptable input voltage for the LM7805 regulator. I figured out what each of these terminals is for by studying the aftermarket wireless opener module that attaches here.
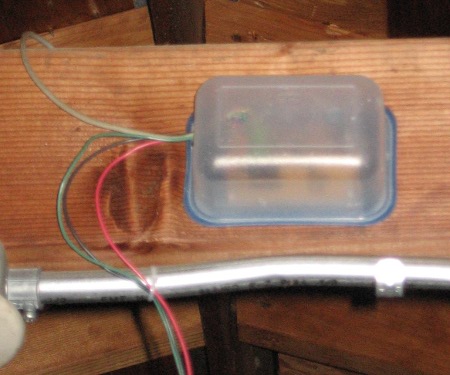
The little board is quite happy up in the rafters. I reused a run of abandoned telephone wiring from the basement. It’s the grey wire running up and out to the doorbell which is in the outer jam. The green, black, and red wires are 20 awg solid hookup wire I had laying around.
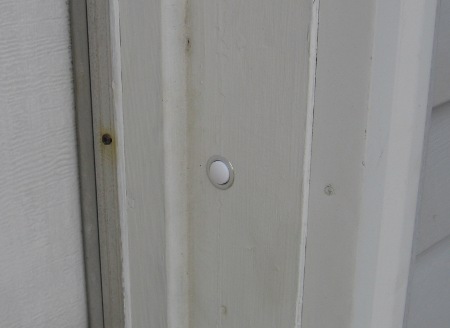
And here’s the button. Inconspicuous and handy all at the same time.
Parts
I had many of the parts I needed on hand. That being said, the ‘expensive’ ones I did order from SparkFun, paying just $4.41 for shipping (and the package came quite quickly). I would say my total out-of-pocket on this project was $21.50 because I ordered some extra parts for future projects. In my mind, that’s a steal just for the entertainment value of the project.
Capacitor	100uF			$0.35
Capacitor	10uF			$0.45
Capacitor	0.1uF			on hand
Diode		1N4148			$0.15
Voltage Reg.	LM7805			$1.25
Terminal Conn	1x6			$1.50
Transistor	2N3904			$0.75
Resistor (x2)	10k			on hand
Resistor	1k			on hand
Resistor	180			on hand
Switch		Momentary Push		on hand
On/Off Switch	SPDT			on hand
Microprocessor	ATtiny13		$2.00 (on hand)
Relay		SPDT			$1.95
Protoboard	Radio Shack 276-149	$1.99 (on hand)
Door Bell	Home Depot		$3.50
Schematic
Code
/*--------------------------------------------------------------------------
Garage Entry
Copyright (c) 2010 Mike Szczys

 Permission is hereby granted, free of charge, to any person obtaining a copy
 of this software and associated documentation files (the "Software"), to deal
 in the Software without restriction, including without limitation the rights
 to use, copy, modify, merge, publish, distribute, sublicense, and/or sell
 copies of the Software, and to permit persons to whom the Software is
 furnished to do so, subject to the following conditions:

 The above copyright notice and this permission notice shall be included in
 all copies or substantial portions of the Software.

 THE SOFTWARE IS PROVIDED "AS IS", WITHOUT WARRANTY OF ANY KIND, EXPRESS OR
 IMPLIED, INCLUDING BUT NOT LIMITED TO THE WARRANTIES OF MERCHANTABILITY,
 FITNESS FOR A PARTICULAR PURPOSE AND NONINFRINGEMENT. IN NO EVENT SHALL THE
 AUTHORS OR COPYRIGHT HOLDERS BE LIABLE FOR ANY CLAIM, DAMAGES OR OTHER
 LIABILITY, WHETHER IN AN ACTION OF CONTRACT, TORT OR OTHERWISE, ARISING FROM,
 OUT OF OR IN CONNECTION WITH THE SOFTWARE OR THE USE OR OTHER DEALINGS IN
 THE SOFTWARE.
--------------------------------------------------------------------------*/
/*--------------------------------------------------------------------------
  This project uses an ATtiny13 to take entry from a single button and
  display status with a single LED. A proper code entry will trigger a
  relay and open a garage door. There is functionality for changing the
  default code using a programming button. For more information:
    http://jumptuck.wordpress.com/2010/08/01/garage-door-code-button/
--------------------------------------------------------------------------*/

#define F_CPU 1200000

#include <avr/io.h>
#include <avr/interrupt.h>
#include <avr/eeprom.h>

//Set default security code here
unsigned char EEMEM code1 = 1;
unsigned char EEMEM code2 = 2;
unsigned char EEMEM code3 = 3;
unsigned char EEMEM code4 = 4;

#define KEY_DDR		DDRB
#define KEY_PORT	PORTB
#define KEY_PIN		PINB
#define KEY0		1	//User button
#define KEY1		3	//Programming jumper

#define LED_DDR		DDRB
#define LED_PORT	PORTB
#define LED0		2

#define LOAD_DDR	DDRB
#define LOAD_PORT	PORTB
#define LOAD0		4

//State aliases
#define STATE_REST		0
#define STATE_ENTRY		1
#define STATE_PROGRAM_WAIT	2
#define STATE_PROGRAM 		3

//System
volatile unsigned char systick = 0;

unsigned char entry_index = 0;
unsigned char entry_code[4];

//Debounce
unsigned char debounce_cnt = 0;
volatile unsigned char key_press;
unsigned char key_state;

/*--------------------------------------------------------------------------
  Prototypes
--------------------------------------------------------------------------*/
unsigned char get_key_press( unsigned char key_mask );
void init_timers(void);
void init_io(void);
void delay_ms(unsigned int n);
void blink_LED(unsigned char times, unsigned int duration_ms);
void initialize_entry_code(void);
unsigned char system_reset(unsigned char state);
void readback(void);
void check_code(unsigned char state);

/*--------------------------------------------------------------------------
  FUNC: 7/23/10 - Used to read debounced button presses
  PARAMS: A keymask corresponding to the pin for the button you with to poll
  RETURNS: A keymask where any high bits represent a button press
--------------------------------------------------------------------------*/
unsigned char get_key_press( unsigned char key_mask )
{
  cli();			// read and clear atomic !
  key_mask &= key_press;	// read key(s)
  key_press ^= key_mask;	// clear key(s)
  sei();
  return key_mask;
}

/*--------------------------------------------------------------------------
  FUNC: 7/23/10 - Sets and starts a system timer
  PARAMS: NONE
  RETURNS: NONE
--------------------------------------------------------------------------*/
void init_timers(void)
{
  cli();
  //Timer0 for buttons
  TCCR0B |= 1<<CS02 | 1<<CS00;	//Divide by 1024
  TIMSK0 |= 1<<TOIE0;		//enable timer overflow interrupt
  sei();
}

/*--------------------------------------------------------------------------
  FUNC: 7/23/10 - Initialize input and output registers
  PARAMS: NONE
  RETURNS: NONE
--------------------------------------------------------------------------*/
void init_io(void)
{
  //Setup Button
  KEY_DDR &= ~(1<<KEY0);
  KEY_PORT |= (1<<KEY0) | (1<<KEY1);	//enable pull-up resistor

  //Setup LED
  LED_DDR |= 1<<LED0;
  LED_PORT &= ~(1<<LED0);

  //Setup Load (relay pin)
  LOAD_DDR |= 1<<LOAD0;
  LOAD_PORT &= ~(1<<LOAD0);
}

/*--------------------------------------------------------------------------
  FUNC: 7/23/10 - Wastes approximately n milliseconds
  PARAMS: Duration in milliseconds
  RETURNS: NONE
--------------------------------------------------------------------------*/
void delay_ms(unsigned int n)
{
  systick = 0;
  while (systick < n/10);
  systick = 0;
}

/*--------------------------------------------------------------------------
  FUNC: 7/23/10 - Blinks LED in the doorbell
  PARAMS
    1: # of times to blink
    2: Duration in milliseconds
  RETURNS: NONE
  NOTES: This is a blocking function.  When the LED blinks, the only other code
    that can execute is in interrupt handlers.
--------------------------------------------------------------------------*/
void blink_LED(unsigned char times, unsigned int duration_ms)
{
  //while (times--)
  for (unsigned char i=times; i>0; i--)
  {
    LED_PORT |= 1<<LED0;
    delay_ms(duration_ms);
    LED_PORT &= ~(1<<LED0);
    if (i >= 1) delay_ms(duration_ms);
    else systick=0;
  }
}

/*--------------------------------------------------------------------------
  FUNC: 7/23/10 - Inits the entry code variables
  PARAMS: NONE
  RETURNS: NONE
--------------------------------------------------------------------------*/
void initialize_entry_code(void)
{
  for (unsigned char i=0; i<4; i++)
  {
    entry_code[i] = 0;
  }
  entry_index = 0;
}

/*--------------------------------------------------------------------------
  FUNC: 7/23/10 - Resets the system
  PARAMS: NONE
  RETURNS: NONE
  NOTES: Sets state to rest, sets code array to all 0, blinks the LED quickly
--------------------------------------------------------------------------*/
unsigned char system_reset(unsigned char state)
{
  initialize_entry_code();
  blink_LED(12,100);
  return STATE_REST;
}

/*--------------------------------------------------------------------------
  FUNC: 7/23/10 - Displays a 4 digit code in a series of LED blinks
  PARAMS: NONE
  RETURNS: NONE
--------------------------------------------------------------------------*/
void readback(void)
{
  for (unsigned char i=0; i<4; i++)
  {
    blink_LED(entry_code[i],200);
    delay_ms(1500);
  }
}

/*--------------------------------------------------------------------------
  FUNC: 7/23/10 - Used to set new code entrys or check codes for access
  PARAMS: Program state - STATE_PROGRAM (used to set new code)
  RETURNS: NONE
--------------------------------------------------------------------------*/
void check_code(unsigned char state)
{
  if (state == STATE_PROGRAM)
  {
    //Write the new code to EEPROM
    eeprom_write_byte(&code1,entry_code[0]);
    eeprom_write_byte(&code2,entry_code[1]);
    eeprom_write_byte(&code3,entry_code[2]);
    eeprom_write_byte(&code4,entry_code[3]);
    readback();
  }
  //Verify the code entered is correct
  else if (entry_code[0]==eeprom_read_byte(&code1) && entry_code[1]==eeprom_read_byte(&code2) && entry_code[2]==eeprom_read_byte(&code3) && entry_code[3]==eeprom_read_byte(&code4))
  {
    //Cycle to load to open the door
    LOAD_PORT |= 1<<LOAD0;
    delay_ms(800);
    LOAD_PORT &= ~(1<<LOAD0);
  }
  else state = system_reset(state);
}

/*--------------------------------------------------------------------------
  FUNC: 7/23/10 - Main
--------------------------------------------------------------------------*/
int main(void)
{
  init_timers();
  init_io();

  unsigned char state = STATE_REST;
  unsigned char system_timeout = 0;

  for (;;) {
    switch(state){
      case STATE_REST :
        if( get_key_press( 1<<KEY0 )) {
          //Set entry index and array data to zero
          initialize_entry_code();
          //Set state to STATE_ENTRY
          state = STATE_ENTRY;
          //blink LED once (also resets systick)
          blink_LED(1,600);
          systick=0;
        }
        else if (get_key_press( 1<<KEY1 ))
        {
          //Programming button has been pushed
          state = STATE_PROGRAM_WAIT;
          system_timeout = 0;
          initialize_entry_code();
        }
      break;

      case STATE_PROGRAM_WAIT:
        //Waiting for code entry.
        if( get_key_press( 1<<KEY0 )) {
	  state = STATE_PROGRAM;
	  blink_LED(1,600);	//signal that we're ready for first entry
	  systick=0;
	}
	//Flash until user button is pushed
	else if ( systick > 50 ) {
	  LED_PORT ^= 1<<LED0;
	  systick = 0;
	  //We've been idle for 2 minutes so reset the system.
	  if (++system_timeout > 240) state = system_reset(state);
	}
      break;

      case STATE_PROGRAM:
      case STATE_ENTRY:
	//Has entry timed out?
	if (systick > 150) {
	  //Make sure a number was entered
	  if(entry_code[entry_index]) {
	    //check if that was the final digit
	    if(++entry_index>3)	{
	      check_code(state);
	      state = STATE_REST;
	    }
	    //Confirm with a blink (resets systick)
	    else blink_LED(1,600);
	  }
	  //current code is 0 which is not allowed, reset the system
	  else {
	    state = system_reset(state);
	  }
      	}
      	else if( get_key_press( 1<<KEY0 )) {
	  //increment digit to array
	  ++entry_code[entry_index];
	  //reset systick because button was just pushed
	  systick = 0;
      	}
      break;
    }
  }
}

//--------------------------------------------------------------------------
ISR(TIM0_OVF_vect)           // every 10ms
{
  static unsigned char ct0, ct1;
  unsigned char i;

  TCNT0 = (unsigned char)(signed short)-(((F_CPU / 1024) * .01) + 0.5);   // preload for 10ms

  i = key_state ^ ~KEY_PIN;    // key changed ?
  ct0 = ~( ct0 & i );          // reset or count ct0
  ct1 = ct0 ^ (ct1 & i);       // reset or count ct1
  i &= ct0 & ct1;              // count until roll over ?
  key_state ^= i;              // then toggle debounced state
  key_press |= key_state & i;  // 0->1: key press detect

  ++systick;
}
Conclusion
It works like a charm! I didn’t have room for the code needed to put the chip to sleep and wake it with a pin interrupt. I measured the prototype and got a 7.68 mA current draw when idle so I’m not too concerned about waste. I may try rewriting the code so that there is a hardcoded “program mode” passcode. In other words, if you want to reset the entry code you don’t have to climb up on a ladder and press the button inside, you just use the doorbell to input the programming passcode. This could be made an impossible number since each of the four digits can be up to 255 (they’re an array of unsigned chars). But I digress, I had fun and accomplished my goals for just a few dollars in parts. Success!


