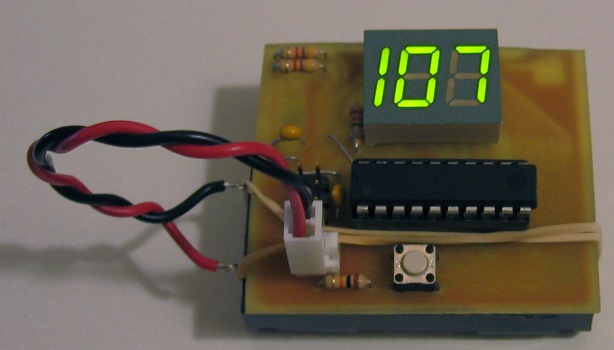
 I’ve been working with some 7 segment displays lately. I found an old computer on the side of the road and pulled a 3-digit display out of it. The hundreds digit can only display a 1 and it has no decimal points. After pulling it off of the board I find that it is a 16-pin module; one pin is common anode, one pin is the cathode for both segments of the hundreds digit, and the other 14 pins are cathode pins for one segment each.
I did some breadboarding with this module and was able to get things working pretty easily. When I decided to do some PCB design things became more complicated. For ease of programming I had connected all of the segments of the ones digit to PortD of an ATtiny2313. I then connected all of the segments of the tens digit as well as the single pin for hundreds to PortB. This setup makes for easy coding as each number you want to display can be stored as an 8-bit char and written directly the the Port for the corresponding digit. The problem is that the board design to match this is not at all easy.
For me, the coding is much easier than creating the board. I prefer one-sided designs and try to avoid passing traces between dip-pads if possible. This can be accomplished but not at the same time as keeping all the segments of one digit on the same Port of an AVR chip. So the challenge presented itself: what can I do with code to compensate for the complication that the board design introduced?
I decided on a three step approach:
- Define a bit setting of each segment of the display. Pins on one of the two ports will be shifted an additional 8 bits to work with the next two steps.
- Use an array of each character you wish to show on each digit of the display. Characters are stored as a 16-bit int.
- When writing to the display, both ports are written using an int from the array in step 2. The int is cast as a char for the first Port, then shifted 8 bits to the right and used for the second Port.
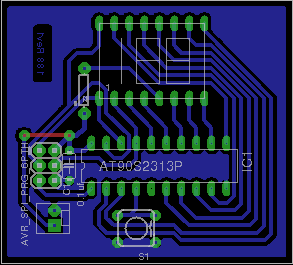
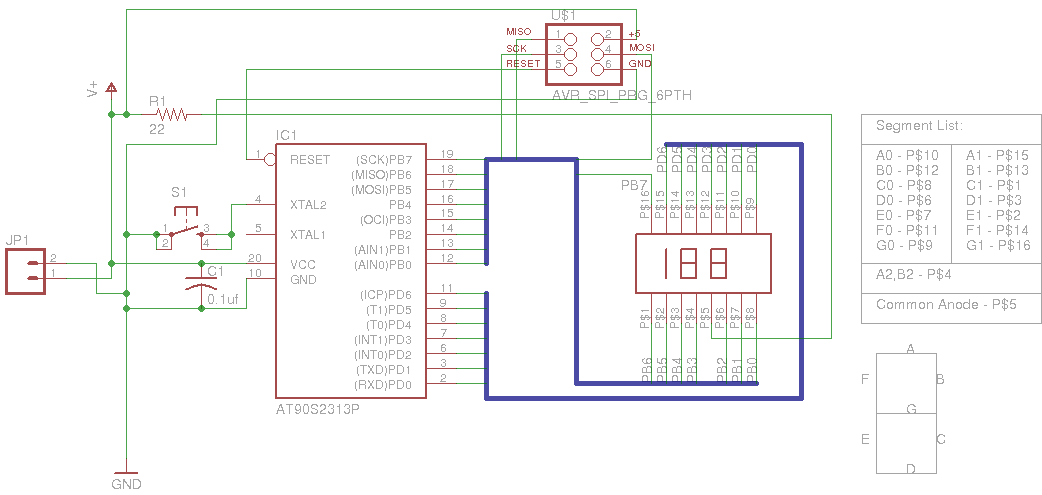
Schematic & Board:
Note that I am using 1 resistor on the common anode. I will be driving this circuit with two 1.5v batteries for a total of 3v. I will ensure that in the code there will never be less than 4 segments on at one time (displays the number 11, otherwise the tens digit will show a zero when displaying a number less than 10). With four segments illuminated there will be about 25mA to each segment.
Code:
Step 1 code: Define each segment on the display. Segments that are connected to Port B will eventually be stored in the Least Significant BYTE of an Int so no need to do any additional shifting there. Segments controlled by Port D will be stored in the Most Significant BYTE of an Int so they do need to be shifted an additional 8 bits to the left (hence the ‘+8’ behind each PD* assignment).
//Define each segment of each digit of the display
//Segments run by PORTD will be shifted 8 bits to
//the left.  The pin that runs the hundreds digit
//is on PORTB.

#define A0 (1 << (PD1+8))
#define B0 (1 << (PD3+8))
#define C0 (1 << PB0)
#define D0 (1 << PB2)
#define E0 (1 << PB1)
#define F0 (1 << (PD2+8))
#define G0 (1 << (PD0+8))

#define A1 (1 << (PD6+8))
#define B1 (1 << (PD4+8))
#define C1 (1 << PB6)
#define D1 (1 << PB4)
#define E1 (1 << PB5)
#define F1 (1 << (PD5+8))
#define G1 (1 << PB7)

#define A2 (1 <> 8);		//Set PORTD with 8 MSB of our mask
}
Full working code example (no button support):
#define F_CPU 1000000UL

#include
#include

//Define each segment of each digit of the display
//Segments run by PORTD will be shifted 8 bits to
//the left.  The pin that runs the hundreds digit
//is on PORTB.

#define A0 (1 << (PD1+8))
#define B0 (1 << (PD3+8))
#define C0 (1 << PB0)
#define D0 (1 << PB2)
#define E0 (1 << PB1)
#define F0 (1 << (PD2+8))
#define G0 (1 << (PD0+8))

#define A1 (1 << (PD6+8))
#define B1 (1 << (PD4+8))
#define C1 (1 << PB6)
#define D1 (1 << PB4)
#define E1 (1 << PB5)
#define F1 (1 << (PD5+8))
#define G1 (1 << PB7)

#define A2 (1 <> 8);		//Set PORTD with 8 MSB of our mask
}


int main(void) {
  InitPorts();

  while(1) {
    for (unsigned char i=0; i<200; i++)
    {
      numOut(i);
      _delay_ms(200);
    }
  }
}
This works out quite well. It uses a bit more coding space than before but it does the trick. I’ll certainly use this method in the future.


